> ## Documentation Index
> Fetch the complete documentation index at: https://docs.akapulu.com/llms.txt
> Use this file to discover all available pages before exploring further.
# How it works
> High-level overview of how Akapulu Labs powers real-time conversational experiences.
## About Akapulu Labs
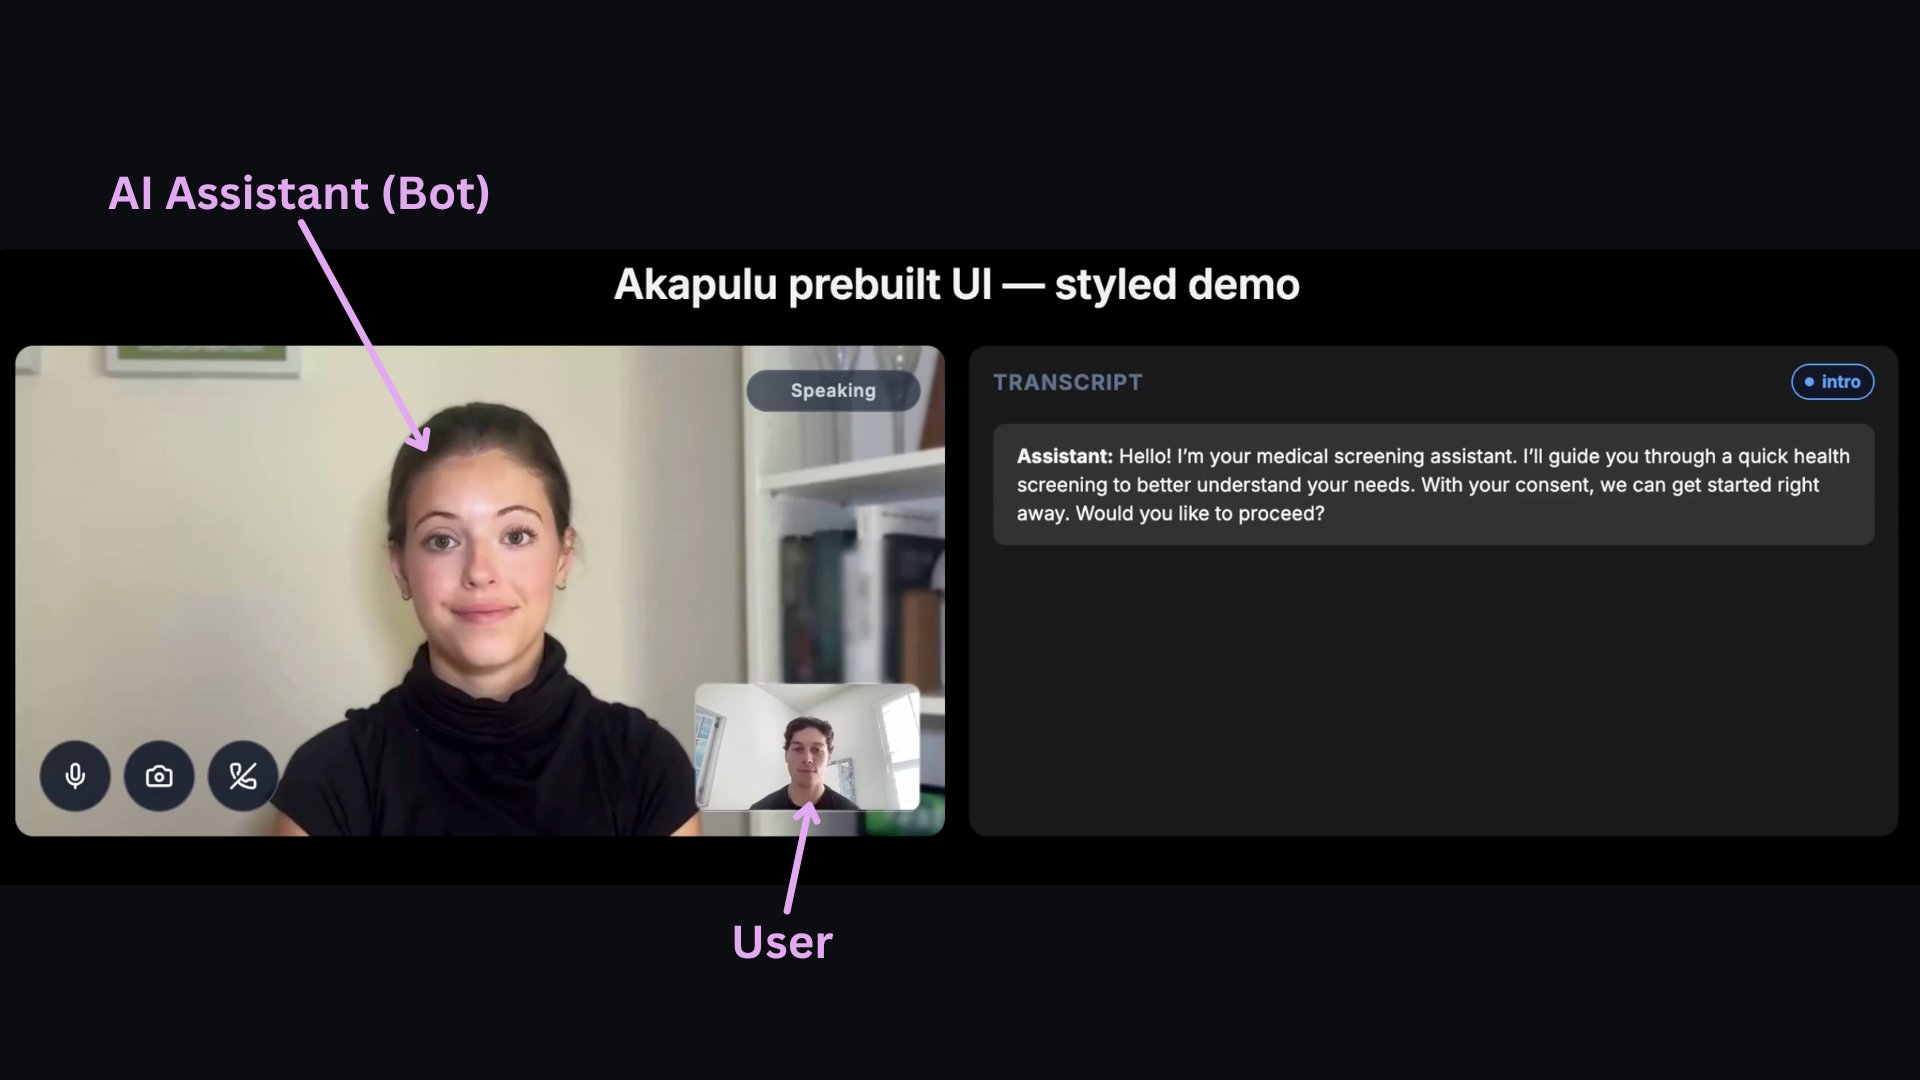
* Akapulu Labs is an AI research lab building a platform for real-time conversational video and voice experiences.
* It helps you launch AI assistants (bots) that join live calls with users: the user speaks naturally, and the bot listens, responds in real time, and follows your configured instructions and tools.
 ## Architecture
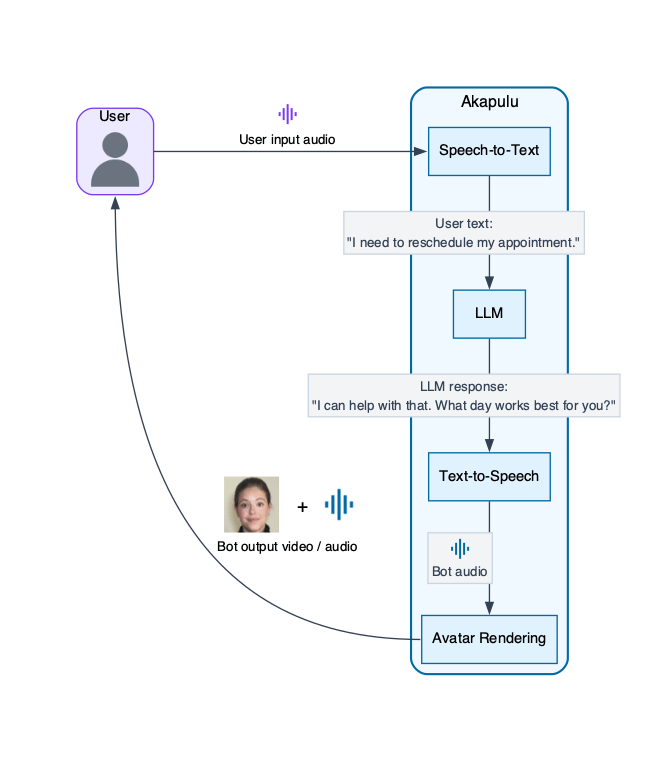
Akapulu Labs runs each conversation through a real-time pipeline of linked stages: it receives user audio (and optionally video) input, generates the bot's spoken response, and streams synchronized audio and avatar video frames back to the user.
Each stage in that pipeline has a specific role, described below.
* **User media input:** receives the user's microphone audio and optional camera video from the call.
* **STT (speech-to-text):** converts the user's spoken audio into text the LLM can process.
* **LLM (reasoning layer):** reads the transcribed user input plus your instructions, then decides what to say and which tools to call.
* **TTS (text-to-speech):** turns the LLM's text response into spoken audio for the bot.
* **Avatar rendering/animation:** synchronizes the avatar's face and mouth movement to the generated speech so the response is delivered as a talking avatar.
* **Avatar media output:** streams the bot's synthesized audio and rendered avatar video frames back to the user in real time.
### Conversation pipeline
## Architecture
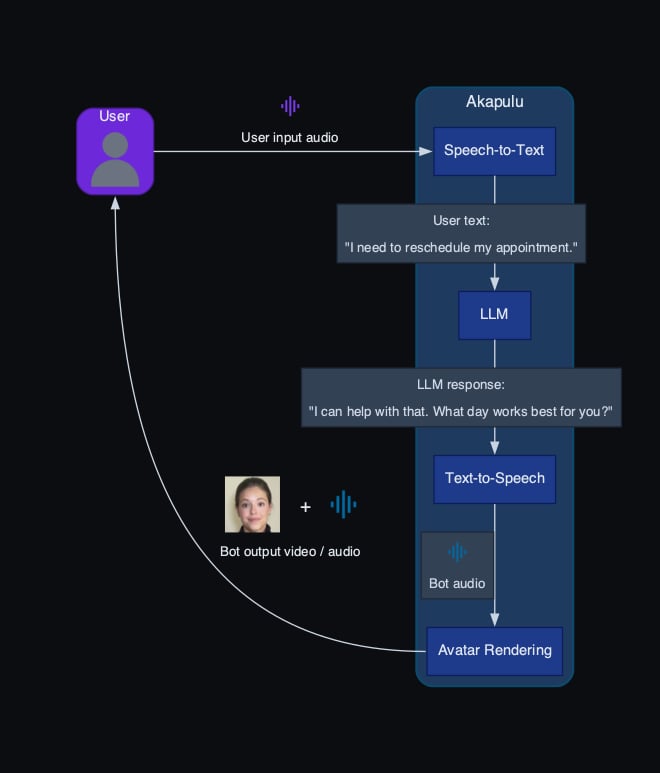
Akapulu Labs runs each conversation through a real-time pipeline of linked stages: it receives user audio (and optionally video) input, generates the bot's spoken response, and streams synchronized audio and avatar video frames back to the user.
Each stage in that pipeline has a specific role, described below.
* **User media input:** receives the user's microphone audio and optional camera video from the call.
* **STT (speech-to-text):** converts the user's spoken audio into text the LLM can process.
* **LLM (reasoning layer):** reads the transcribed user input plus your instructions, then decides what to say and which tools to call.
* **TTS (text-to-speech):** turns the LLM's text response into spoken audio for the bot.
* **Avatar rendering/animation:** synchronizes the avatar's face and mouth movement to the generated speech so the response is delivered as a talking avatar.
* **Avatar media output:** streams the bot's synthesized audio and rendered avatar video frames back to the user in real time.
### Conversation pipeline
 ## Controlling bot behavior
The content of the bot's response is determined in the LLM section of the pipeline. This is where you control behavior through both global role prompts (for the avatar's overall persona, tone, and guardrails) and node-level instructions (for what to do in each stage), plus the tools and knowledge that the llm has access to.
In Akapulu Labs, you apply that behavior by launching each conversation with a [scenario](/guides/scenarios/overview). The scenario provides the global role context, node-specific instructions, tool access, and flow that the LLM uses during the conversation.
## Scenarios and conversation stages
For most real conversations, a single static prompt does not provide enough control. The assistant often needs different guidance and tools at different moments in the conversation, and the ability to take certain actions according to predefined criteria.
A scenario lets you design that flow as a set of stages. At each stage, you can decide:
* what the assistant should focus on right now
* how it should respond
* which tools it can use at that point
As well as a global role prompt that applies across the full conversation
As the conversation evolves, the assistant can move from stage to stage when appropriate. This keeps behavior focused and predictable.
For example:
* **Interview Training Avatar** — An AI interview coach that runs a candidate through the phases of a realistic hiring conversation (rapport, background, technical depth, wrap-up). You would build this to give people a safe, repeatable way to practice answers and pacing before real interviews—without needing a human interviewer for every session, while still enforcing a clear structure and branch points (for example, extra review when answers miss the bar).
*Stage flow:* intro and rapport → general background questions → technical questions → next steps
*Example guidance for the LLM*
```mermaid theme={null}
flowchart TD
RP[You are a supportive interview coach]
A[Intro and rapport] --> B[General background questions]
B --> C[Technical questions]
C <-- needs review --> D[Review]
C -- meets expectations --> E[Next steps]
classDef startNode fill:#15803d,color:#ffffff,stroke:#14532d,stroke-width:2px;
classDef endNode fill:#dc2626,color:#ffffff,stroke:#991b1b,stroke-width:2px;
classDef stageNode fill:#1d4ed8,color:#ffffff,stroke:#1e3a8a,stroke-width:2px;
classDef rolePrompt fill:#e9d5ff,color:#4c1d95,stroke:#7c3aed,stroke-width:2px,stroke-dasharray: 5 3;
class RP rolePrompt;
class A startNode;
class D endNode;
class B,C,E stageNode;
linkStyle default stroke:#64748b,stroke-width:2px;
```
* **Patient Intake Screening** — A front-door assistant that guides a patient through consent, structured data collection, booking, and follow-up questions, optionally using vision or knowledge-base tools along the way. You would build this to offload routine intake from staff, keep the conversation consistent with policy, and let patients self-serve scheduling and common Q\&A while still escalating or ending cleanly when appropriate.
*Stage flow:* intro → data intake → appointment booking → Q\&A → end
*Example guidance for the LLM*
```mermaid theme={null}
flowchart TD
RP[You are a friendly medical screener]
A[Welcome the patient and ask for consent]
A -- consent given --> B[Collect basic details and symptoms]
A -- no consent --> Z[End the screening]
B -- details collected --> C[Schedule the appointment]
B <--> V[Look at the symptom on camera]
C -- booking submitted --> D[Answer patient questions]
D -- patient ready to finish --> E[Close the conversation]
D <--> R[Check clinic information]
classDef startNode fill:#15803d,color:#ffffff,stroke:#14532d,stroke-width:2px;
classDef endNode fill:#dc2626,color:#ffffff,stroke:#991b1b,stroke-width:2px;
classDef stageNode fill:#1d4ed8,color:#ffffff,stroke:#1e3a8a,stroke-width:2px;
classDef toolNode fill:#7c3aed,color:#ffffff,stroke:#6b7280,stroke-width:3.5px,stroke-dasharray: 6 3;
classDef rolePrompt fill:#e9d5ff,color:#4c1d95,stroke:#7c3aed,stroke-width:2px,stroke-dasharray: 5 3;
class RP rolePrompt;
class A startNode;
class Z,E endNode;
class B,C,D stageNode;
class V,R toolNode;
linkStyle default stroke:#64748b,stroke-width:2px;
```
## Nodes
Akapulu Labs implements these stages using [nodes](/guides/scenarios/node-basics). A node has custom instructions for the LLM and the specific tools connected to that node.
The bot (LLM) can choose to transition to different nodes through tool calls.
## Controlling bot behavior
The content of the bot's response is determined in the LLM section of the pipeline. This is where you control behavior through both global role prompts (for the avatar's overall persona, tone, and guardrails) and node-level instructions (for what to do in each stage), plus the tools and knowledge that the llm has access to.
In Akapulu Labs, you apply that behavior by launching each conversation with a [scenario](/guides/scenarios/overview). The scenario provides the global role context, node-specific instructions, tool access, and flow that the LLM uses during the conversation.
## Scenarios and conversation stages
For most real conversations, a single static prompt does not provide enough control. The assistant often needs different guidance and tools at different moments in the conversation, and the ability to take certain actions according to predefined criteria.
A scenario lets you design that flow as a set of stages. At each stage, you can decide:
* what the assistant should focus on right now
* how it should respond
* which tools it can use at that point
As well as a global role prompt that applies across the full conversation
As the conversation evolves, the assistant can move from stage to stage when appropriate. This keeps behavior focused and predictable.
For example:
* **Interview Training Avatar** — An AI interview coach that runs a candidate through the phases of a realistic hiring conversation (rapport, background, technical depth, wrap-up). You would build this to give people a safe, repeatable way to practice answers and pacing before real interviews—without needing a human interviewer for every session, while still enforcing a clear structure and branch points (for example, extra review when answers miss the bar).
*Stage flow:* intro and rapport → general background questions → technical questions → next steps
*Example guidance for the LLM*
```mermaid theme={null}
flowchart TD
RP[You are a supportive interview coach]
A[Intro and rapport] --> B[General background questions]
B --> C[Technical questions]
C <-- needs review --> D[Review]
C -- meets expectations --> E[Next steps]
classDef startNode fill:#15803d,color:#ffffff,stroke:#14532d,stroke-width:2px;
classDef endNode fill:#dc2626,color:#ffffff,stroke:#991b1b,stroke-width:2px;
classDef stageNode fill:#1d4ed8,color:#ffffff,stroke:#1e3a8a,stroke-width:2px;
classDef rolePrompt fill:#e9d5ff,color:#4c1d95,stroke:#7c3aed,stroke-width:2px,stroke-dasharray: 5 3;
class RP rolePrompt;
class A startNode;
class D endNode;
class B,C,E stageNode;
linkStyle default stroke:#64748b,stroke-width:2px;
```
* **Patient Intake Screening** — A front-door assistant that guides a patient through consent, structured data collection, booking, and follow-up questions, optionally using vision or knowledge-base tools along the way. You would build this to offload routine intake from staff, keep the conversation consistent with policy, and let patients self-serve scheduling and common Q\&A while still escalating or ending cleanly when appropriate.
*Stage flow:* intro → data intake → appointment booking → Q\&A → end
*Example guidance for the LLM*
```mermaid theme={null}
flowchart TD
RP[You are a friendly medical screener]
A[Welcome the patient and ask for consent]
A -- consent given --> B[Collect basic details and symptoms]
A -- no consent --> Z[End the screening]
B -- details collected --> C[Schedule the appointment]
B <--> V[Look at the symptom on camera]
C -- booking submitted --> D[Answer patient questions]
D -- patient ready to finish --> E[Close the conversation]
D <--> R[Check clinic information]
classDef startNode fill:#15803d,color:#ffffff,stroke:#14532d,stroke-width:2px;
classDef endNode fill:#dc2626,color:#ffffff,stroke:#991b1b,stroke-width:2px;
classDef stageNode fill:#1d4ed8,color:#ffffff,stroke:#1e3a8a,stroke-width:2px;
classDef toolNode fill:#7c3aed,color:#ffffff,stroke:#6b7280,stroke-width:3.5px,stroke-dasharray: 6 3;
classDef rolePrompt fill:#e9d5ff,color:#4c1d95,stroke:#7c3aed,stroke-width:2px,stroke-dasharray: 5 3;
class RP rolePrompt;
class A startNode;
class Z,E endNode;
class B,C,D stageNode;
class V,R toolNode;
linkStyle default stroke:#64748b,stroke-width:2px;
```
## Nodes
Akapulu Labs implements these stages using [nodes](/guides/scenarios/node-basics). A node has custom instructions for the LLM and the specific tools connected to that node.
The bot (LLM) can choose to transition to different nodes through tool calls.
 Akapulu Labs provides an easy-to-understand drag-and-drop UI for building and connecting nodes.
## Using Akapulu Labs
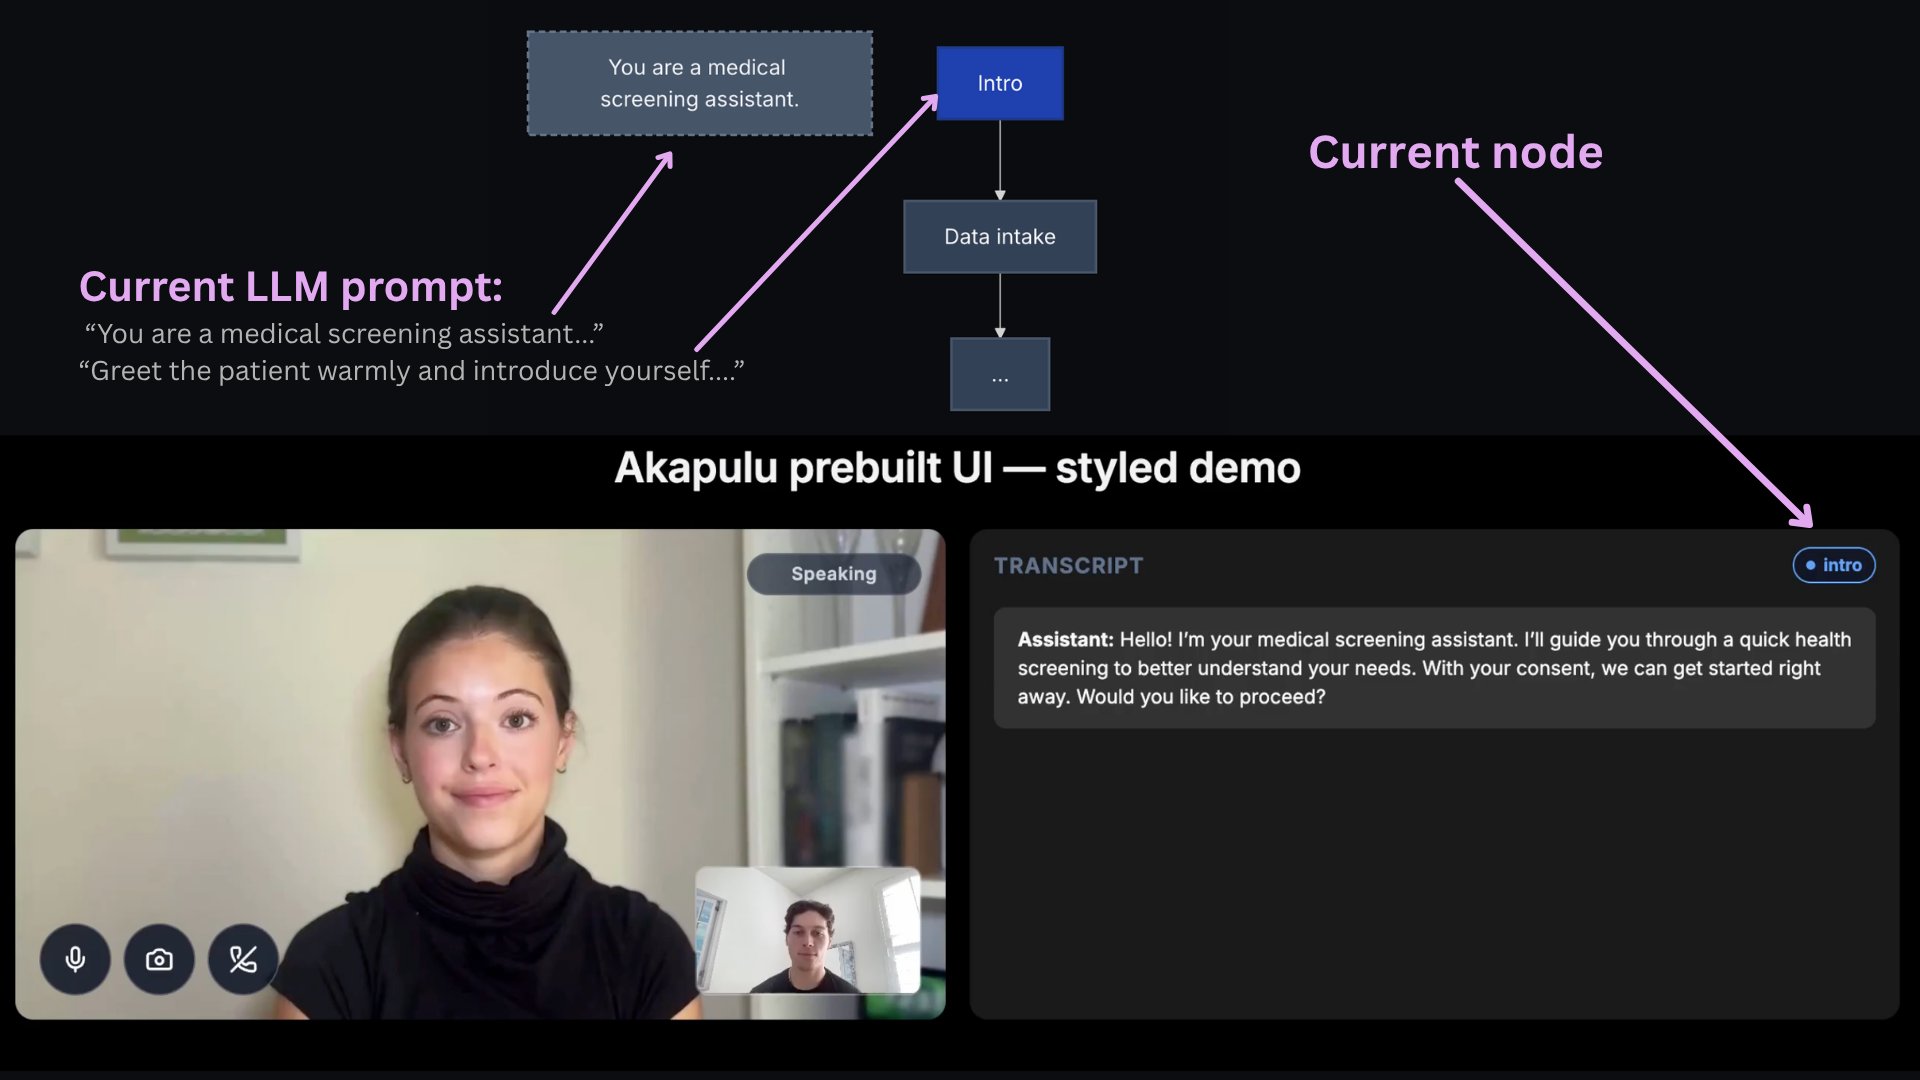
1. Create a scenario for your desired use case, including a global `role_instruction` and node-level `task_instruction` prompts.
> *example id:* `scenario_1234`
```mermaid theme={null}
flowchart TD
RP[You are a medical screening assistant.]
A[Intro] --> B[Data intake] --> C[...]
classDef rolePrompt fill:#475569,color:#f1f5f9,stroke:#64748b,stroke-width:2px,stroke-dasharray: 5 3;
classDef startNode fill:#1e40af,color:#f8fafc,stroke:#1e3a8a,stroke-width:2px;
classDef stageNode fill:#334155,color:#f8fafc,stroke:#475569,stroke-width:2px;
class RP rolePrompt;
class A startNode;
class B,C stageNode;
```
2. Then, to start a conversation, call the [`/connect`](/api-reference/conversations/connect) endpoint and pass **`scenario_id`** (which flow and instructions the bot follows) and **`avatar_id`** (which trained avatar performs the conversation).
Example JSON request body:
```json theme={null}
{
"scenario_id": "scenario_1234",
"avatar_id": "avatar_5678"
}
```
Akapulu Labs then sets up the live call, starts the bot, and has the bot join the call.
3. The user then joins the same call, and you're ready to go!
```mermaid theme={null}
flowchart LR
AK[Akapulu Labs]
ROOM[Live Call]
BOT[Bot runtime]
USER[User]
AK -->|Step 1 - Set up live call| ROOM
AK -->|Step 2 - Start bot| BOT
BOT -->|Step 3 - Bot joins call| ROOM
USER -->|Step 4 - User joins call| ROOM
classDef user fill:#1d4ed8,color:#ffffff,stroke:#1e3a8a,stroke-width:2px;
classDef backend fill:#7c3aed,color:#ffffff,stroke:#4c1d95,stroke-width:2px;
classDef callNode fill:#15803d,color:#ffffff,stroke:#14532d,stroke-width:2px;
classDef bot fill:#b45309,color:#ffffff,stroke:#78350f,stroke-width:2px;
class USER user;
class AK backend;
class ROOM callNode;
class BOT bot;
```
During the call, the llm is prompted according to the given scenario.
Akapulu Labs provides an easy-to-understand drag-and-drop UI for building and connecting nodes.
## Using Akapulu Labs
1. Create a scenario for your desired use case, including a global `role_instruction` and node-level `task_instruction` prompts.
> *example id:* `scenario_1234`
```mermaid theme={null}
flowchart TD
RP[You are a medical screening assistant.]
A[Intro] --> B[Data intake] --> C[...]
classDef rolePrompt fill:#475569,color:#f1f5f9,stroke:#64748b,stroke-width:2px,stroke-dasharray: 5 3;
classDef startNode fill:#1e40af,color:#f8fafc,stroke:#1e3a8a,stroke-width:2px;
classDef stageNode fill:#334155,color:#f8fafc,stroke:#475569,stroke-width:2px;
class RP rolePrompt;
class A startNode;
class B,C stageNode;
```
2. Then, to start a conversation, call the [`/connect`](/api-reference/conversations/connect) endpoint and pass **`scenario_id`** (which flow and instructions the bot follows) and **`avatar_id`** (which trained avatar performs the conversation).
Example JSON request body:
```json theme={null}
{
"scenario_id": "scenario_1234",
"avatar_id": "avatar_5678"
}
```
Akapulu Labs then sets up the live call, starts the bot, and has the bot join the call.
3. The user then joins the same call, and you're ready to go!
```mermaid theme={null}
flowchart LR
AK[Akapulu Labs]
ROOM[Live Call]
BOT[Bot runtime]
USER[User]
AK -->|Step 1 - Set up live call| ROOM
AK -->|Step 2 - Start bot| BOT
BOT -->|Step 3 - Bot joins call| ROOM
USER -->|Step 4 - User joins call| ROOM
classDef user fill:#1d4ed8,color:#ffffff,stroke:#1e3a8a,stroke-width:2px;
classDef backend fill:#7c3aed,color:#ffffff,stroke:#4c1d95,stroke-width:2px;
classDef callNode fill:#15803d,color:#ffffff,stroke:#14532d,stroke-width:2px;
classDef bot fill:#b45309,color:#ffffff,stroke:#78350f,stroke-width:2px;
class USER user;
class AK backend;
class ROOM callNode;
class BOT bot;
```
During the call, the llm is prompted according to the given scenario.
 ## Next steps
* Learn more about [Scenarios](/guides/scenarios/overview) to design node flows and behavior.
* Learn how to [customize the conversation UI](/guides/conversations/customize-conversation-ui) in your frontend.
* Browse [Examples](/examples/index) for end-to-end reference implementations.
## Next steps
* Learn more about [Scenarios](/guides/scenarios/overview) to design node flows and behavior.
* Learn how to [customize the conversation UI](/guides/conversations/customize-conversation-ui) in your frontend.
* Browse [Examples](/examples/index) for end-to-end reference implementations.